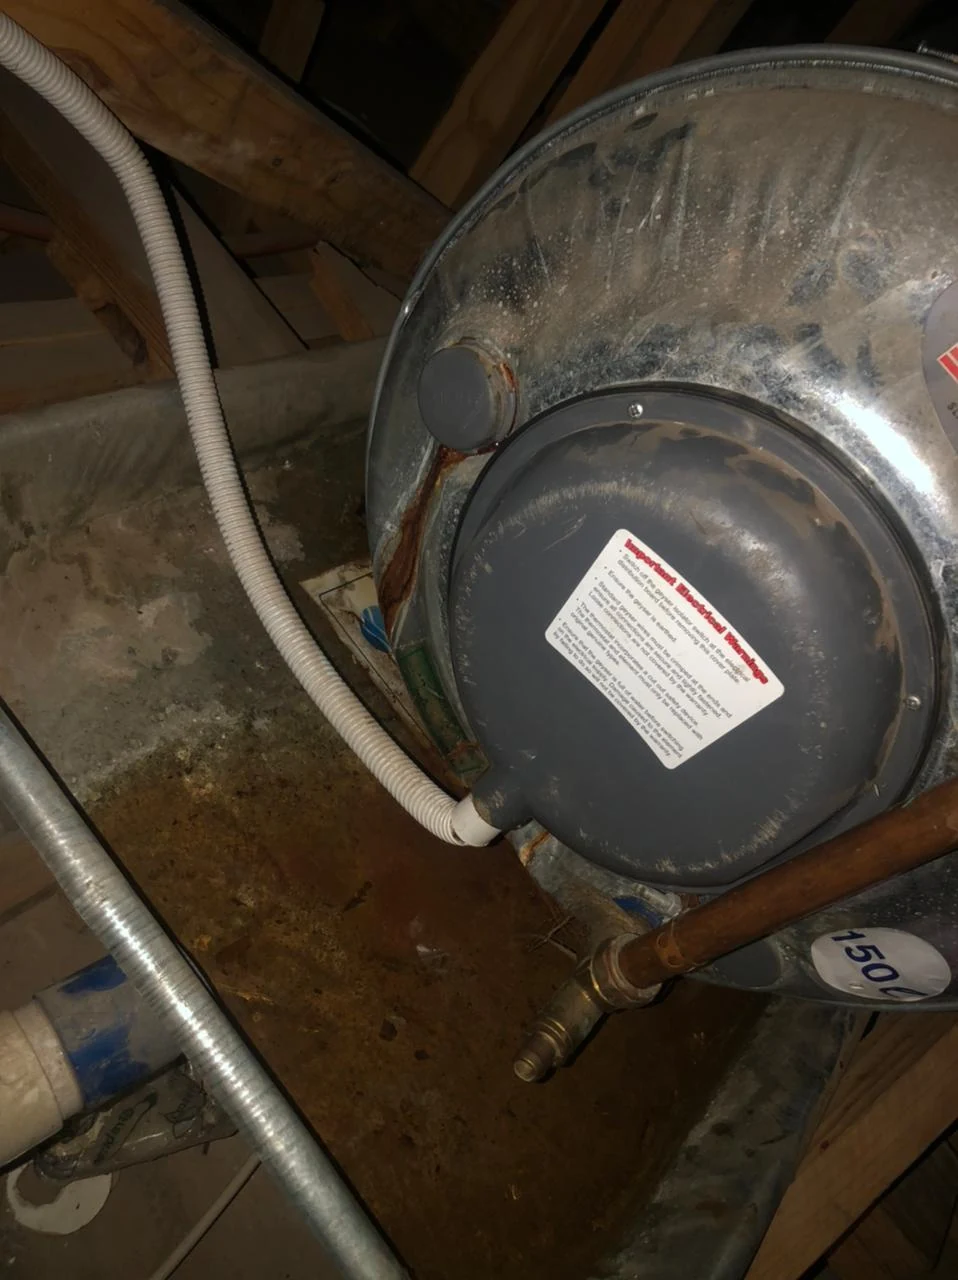
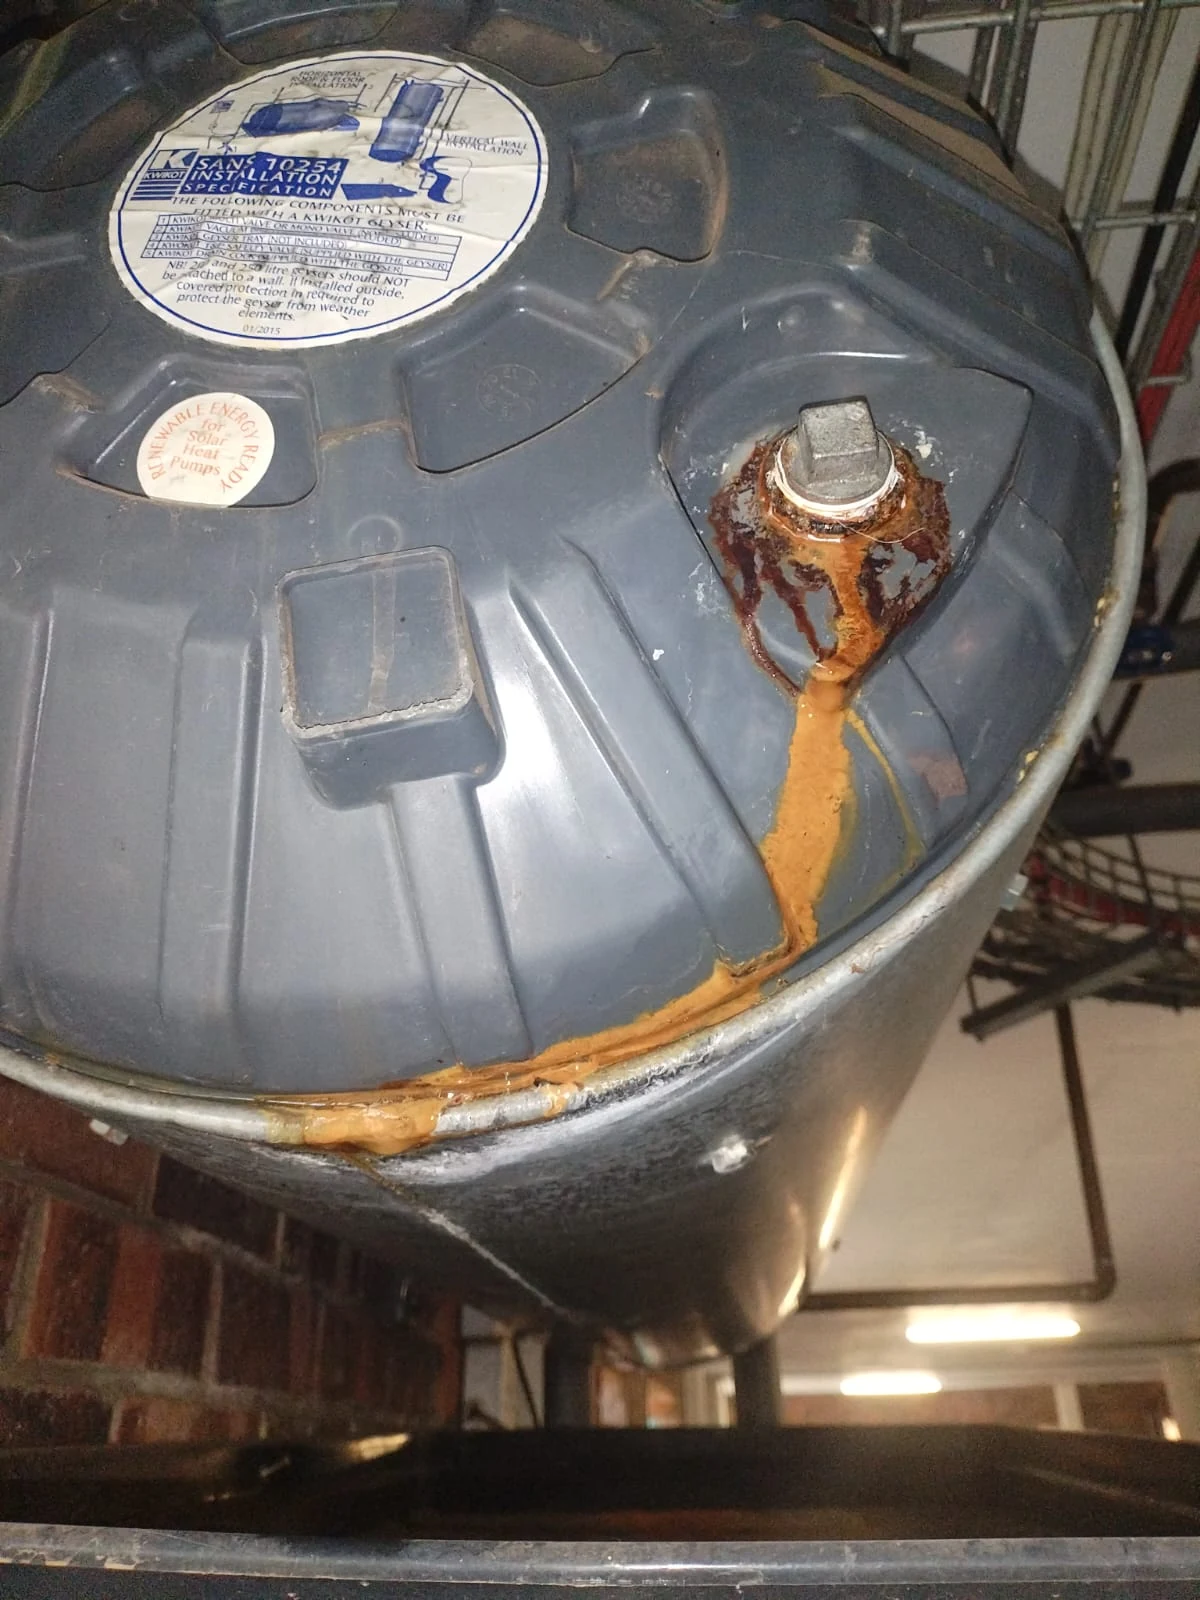
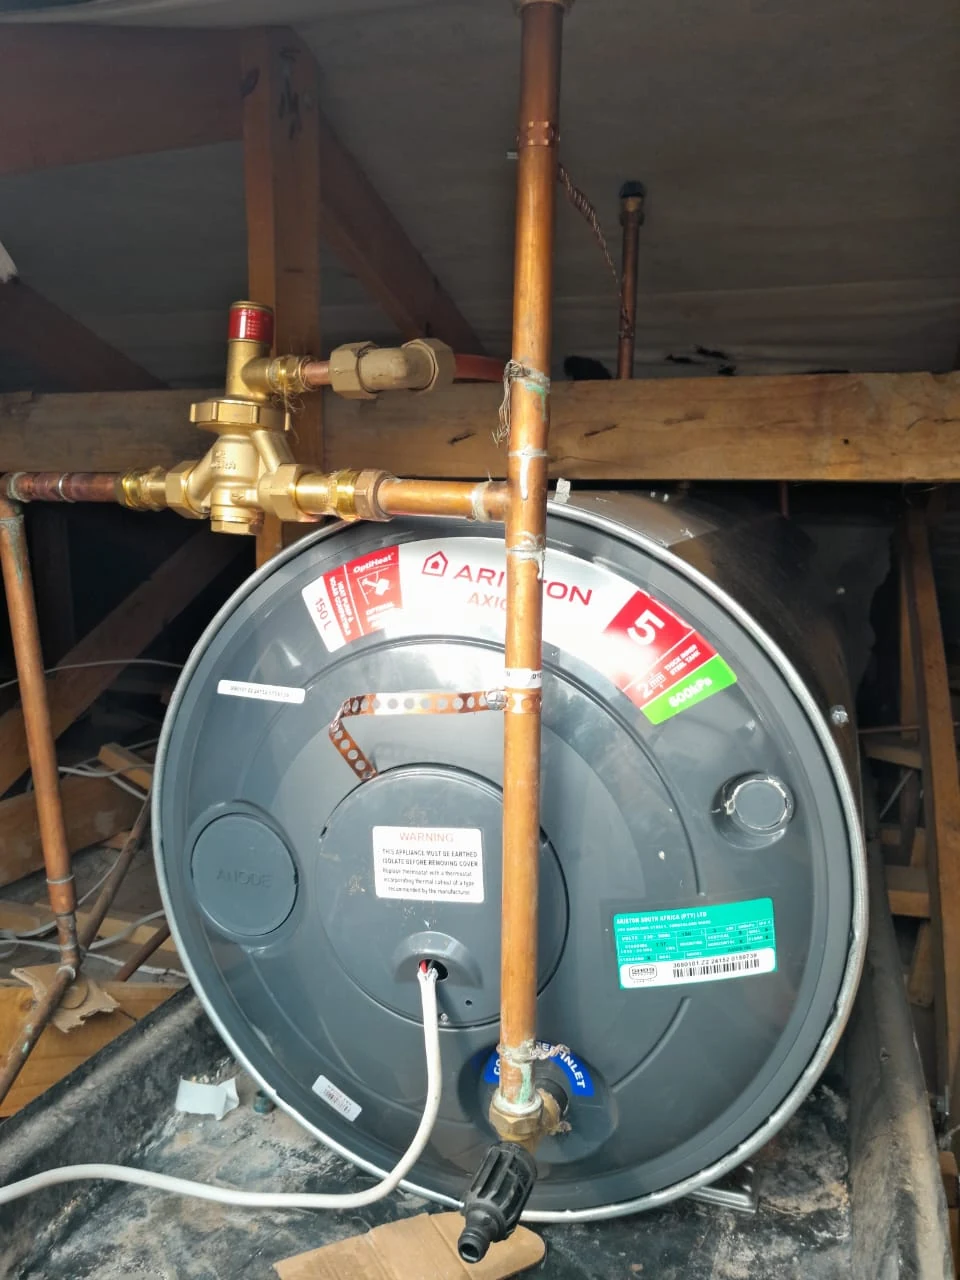
A burst geyser is not only a hot-water problem. It is a water-damage problem, a safety problem, and often an insurance problem too. The most useful first step is to stop the leak safely, protect the property below the geyser, and then work out whether the water is coming from a repairable component or from a failed cylinder.
Our burst geyser replacement service is built around that sequence. We do not treat every wet ceiling as the same fault. A plumber first checks the visible leak path, the valves, the connections, the tank body, the pressure control setup and the installation position before confirming the best replacement route.
Why Some Burst Geysers Cause Thousands Of Rand In Damage While Others Do Not
When a geyser bursts, the cost of the geyser itself is often only a small part of the overall problem. In many cases the most expensive damage occurs in ceilings, insulation, cupboards, flooring, electrical installations, and painted surfaces below the leak. The difference between a manageable repair and a major insurance claim is often how quickly the problem is identified and isolated.
Many homeowners only become aware of the failure once water starts dripping through a ceiling. By that stage the leak may already have been active for days or even weeks inside the roof space. Water can travel along timber, roof trusses, electrical conduits and ceiling boards before becoming visible inside the home. This is why visible water damage often appears far away from the actual geyser failure.
How To Tell The Difference Between A Burst Geyser And A Repairable Leak
One of the biggest misconceptions is that every leaking geyser has burst. Water around a geyser can originate from a failed pressure control valve, leaking vacuum breaker, flange gasket failure, drain cock leak, overflow discharge, loose connection, thermostat cover leak, or a damaged cylinder. Each fault requires a different solution.
A proper inspection starts by identifying exactly where the water originates. Replacing an entire geyser when only a valve has failed can result in unnecessary costs. At the same time, repeatedly replacing valves connected to a severely corroded cylinder may only delay an inevitable replacement. Correct diagnosis comes before any replacement recommendation. Where the tank is still sound, geyser repair may be the better route.
Warning Signs Many Homeowners Miss Before A Geyser Bursts
Most geysers provide warning signs before complete failure. These often include reduced hot water capacity, rusty or discoloured water, unusual hissing or boiling sounds, persistent dripping from safety valves, unexplained increases in water consumption, damp smells in roof spaces, and recurring ceiling stains.
These symptoms are frequently dismissed because hot water is still available. Unfortunately, the internal corrosion process continues long before the tank finally ruptures. Investigating these warning signs early often prevents emergency situations later. If the source of dampness is unclear, leak detection can help trace the active water path before more damage spreads.
What Happens During A Professional Burst Geyser Replacement
The first priority is protecting the property from further damage. Water and electricity are isolated where required and the extent of the leak is assessed. The failed geyser is then drained and removed safely. Before a replacement is installed, the surrounding pipework, valves, drip tray, overflow arrangements, support structure and electrical connections are inspected.
This stage is important because many repeat failures are caused by underlying installation problems rather than the geyser itself. Incorrect pressure control, faulty valves, unsupported pipework, poor drainage arrangements, and ageing components can all shorten the life expectancy of a new geyser if they are not addressed during replacement.
Why Pressure Control Is Often More Important Than The Geyser Itself
Many burst geysers are symptoms of a larger pressure management problem. Excessive pressure places continuous stress on the cylinder, valves and associated fittings. A geyser may be replaced successfully, but if the pressure problem remains unresolved, the new installation may experience premature wear.
For this reason, replacement projects should include inspection of pressure control valves, safety valves, vacuum breakers, expansion control components and discharge arrangements. The objective is not simply replacing the tank but creating a balanced system that operates safely over the long term.
Hidden Damage After A Burst Geyser
Once a geyser has failed, many customers focus only on restoring hot water. However, secondary damage is often overlooked. Wet insulation loses effectiveness, ceiling boards weaken, timber may remain damp long after the leak stops, and electrical installations can be affected by prolonged moisture exposure.
A thorough assessment helps identify these issues early so that they can be addressed before they lead to mould growth, recurring ceiling damage, unpleasant odours, or ongoing structural deterioration. For active water damage or urgent leaks, emergency plumbers near me is the closest related support.
When Replacement Makes More Sense Than Repair
There are situations where repair remains the best option. However, once the geyser cylinder itself has failed, replacement is normally the safest and most economical long-term solution. Repeated repairs on a severely corroded tank rarely provide lasting value and often result in further call-outs, additional water damage, and increased costs over time.
The goal is not simply to restore hot water for today, but to provide a reliable system that reduces the likelihood of another emergency in the near future. If the old setup was poorly positioned or no longer suitable, a full geyser installation approach may be needed rather than a straight swap.
Planning Ahead Before The Next Failure Happens
Many emergency replacements could have been avoided through earlier inspections. Understanding the age of the geyser, monitoring warning signs, checking pressure-related components, and responding quickly to leaks can significantly reduce the likelihood of a sudden burst tank.
Whether the geyser is located in a roof space, cupboard, plant room or commercial facility, preventative attention is usually less disruptive and less expensive than dealing with a complete system failure without warning. Customers who are unsure what type of hot-water fault they have can also use geyser plumbers near me for broader geyser fault-finding support.
What Really Happens During a Burst Geyser Replacement
A burst geyser replacement is not just a matter of taking one cylinder out and putting another one in its place. The job has to control active water damage, protect the electrical side of the installation, confirm the reason the old unit failed, and make sure the new geyser is not exposed to the same fault. A careful replacement process is what prevents the customer from paying twice: once for the new geyser and again for avoidable ceiling, valve or pressure problems later.
Emergency Isolation That Protects the House First

The first part of the job is to stop the situation from getting worse. The plumber identifies how the geyser is being fed, shuts off the water supply where practical, and confirms whether the electrical supply has been isolated safely. This is especially important when water is running through a ceiling, down walls, into cupboards, or close to light fittings and isolators.
Good emergency isolation is more than closing a valve. The plumber must also watch where the remaining water is moving. Sometimes water continues to drain from the failed cylinder, from pipework above the ceiling, or from soaked insulation after the geyser supply has already been closed. Explaining this to the customer helps reduce panic because it shows the difference between an active leak and water that is still escaping from already-wet areas.
Fault Source Check Before Any Replacement Decision

Before the old geyser is condemned, the leak source should be confirmed. Water can come from the tank body, a corroded seam, a safety valve, a vacuum breaker, a flange gasket, a drain cock, a copper connection, a pressure control valve, or nearby pipework. These faults can look very similar from inside the house because the customer may only see a wet ceiling or water dripping from one point.
This inspection protects the customer from unnecessary replacement where the geyser tank is still sound. It also protects the customer from repeated small repairs where the tank has clearly failed. The useful question is not only “where is the water visible?” but “where did the water start?” That answer decides whether geyser repair is still sensible or whether a full replacement is the safer long-term option.
Controlled Draining and Safe Removal

A failed geyser can still hold a large amount of water, even after the leak has started. Removing it too quickly or without proper draining can create more water damage than the original fault. The plumber drains as much water as practical, disconnects the unit carefully, and plans the removal path before shifting the cylinder from a roof space, cupboard, garage, plant room or wall-mounted position.
This stage also includes checking the working area. A ceiling installation may need careful movement around beams, insulation, electrical wiring and access hatches. A cupboard installation may require protection for shelving, tiles or surrounding finishes. The goal is to remove the failed unit without turning the replacement itself into a second damage event.
Checking the Installation Area Before the New Geyser Goes In

One of the most useful parts of a professional replacement happens before the new geyser is fitted. The plumber checks the platform or support, pipe alignment, drip tray, overflow discharge, valve positions, working access, and the condition of surrounding fittings. If the old installation was poorly supported, badly drained, or difficult to maintain, simply copying it may create future problems.
This is where practical experience matters. A new geyser should be installed in a way that allows future inspection, safe isolation, proper overflow discharge and sensible maintenance access. Customers often do not see this work because much of it happens above the ceiling or inside a tight space, but it has a major effect on the reliability of the installation.
New Geyser Installation With Pressure and Safety in Mind

The replacement geyser must match the pressure rating, household demand, available space and existing plumbing layout. The plumber aligns the pipework, connects the safety components, checks overflow arrangements and makes sure the geyser is filled correctly before power is restored. Power should not be turned on before the cylinder is full, because this can damage elements and create unnecessary follow-up faults.
A proper geyser installation also considers how the system will behave after the plumber leaves. The customer should know where the isolation points are, what normal valve discharge looks like, and which signs should not be ignored in future.
Pressure and Valve Verification That Prevents Repeat Failure

Pressure control is one of the most overlooked parts of burst geyser work. A new tank can be placed under constant strain if the pressure reducing valve, safety valve, vacuum breakers or expansion control arrangement is wrong, blocked, worn or mismatched. When that happens, the new geyser may inherit the same conditions that contributed to the old failure.
Valve verification gives the customer more than a new cylinder. It gives them a better chance of long-term reliability. If pressure-related components need replacement, the plumber should explain the reason clearly, because those parts are often the difference between a safe hot-water system and another expensive leak later.
Final Testing, Clean Handover and What to Watch For
Once the system is filled, the plumber checks for leaks around the geyser, valves, fittings and visible pipework. The installation is tested before the job is handed over, and the customer should be shown what was replaced, what was repaired, and what areas should be monitored over the next few hours.
The handover matters because some secondary water damage may continue to show after the plumbing fault has been stopped. Wet insulation, ceiling boards and timber can release moisture slowly. Customers should know when this is normal drying-out behaviour and when it suggests an ongoing leak that may need further leak detection or emergency plumbing support.
Frequently Asked Questions About Burst Geyser Replacement
What should I do first when a geyser bursts?
Switch off the geyser power at the isolator or DB board if it is safe, close the water supply to the geyser or main stop valve, move valuables away from the leak area, and call for emergency help. If water is near electrical fittings, avoid touching wet switches and use the emergency line.
Can a burst geyser tank be repaired?
A burst geyser tank is usually not repairable because the cylinder has failed. Valves, pipes and fittings can often be repaired, but once the tank leaks through the body or seam, burst geyser replacement is normally the safer long-term option.
How do I know if it is a burst geyser or only a valve leak?
A plumber checks where the water starts. Water from a safety valve, vacuum breaker, drain cock or pipe joint may be repairable, while water escaping from the tank body, seam or corroded cylinder usually points to replacement.
Why is ceiling dampness after a geyser leak serious?
Water can travel across roof timber, insulation, electrical conduits and ceiling boards before it becomes visible. Even a small ceiling stain can mean the roof space is already wet, so the geyser and surrounding area should be checked quickly.
Will the plumber isolate the water before removing the geyser?
Yes. The failed geyser is isolated first, then drained in a controlled way where possible. This reduces further water damage and makes removal safer before the replacement unit is installed.
Does a burst geyser replacement include pressure valve checks?
A proper replacement should include pressure control and safety valve checks. Faulty pressure regulation can shorten the life of the new geyser, so valves and related components must be assessed during the replacement process.
Can you replace a geyser in a ceiling or roof space?
Yes. Ceiling and roof-space geysers can be replaced, but access, support, drainage and safe removal all need to be handled carefully. The plumber checks the working area before removing the failed unit.
Should I choose the same size geyser again?
Often the same size is suitable, but the plumber should still consider household demand, available space, pressure, existing pipework and compliance requirements before confirming the replacement size.
Can a burst geyser damage electrical wiring?
Yes. Water from a burst geyser can reach lights, ceiling wiring, isolators or DB-related circuits. If water is near electrical points, power should be switched off safely and the area should not be touched until assessed.
How quickly can hot water be restored after replacement?
Hot water restoration depends on access, draining time, the replacement size, installation conditions and power availability. Once the new unit is installed and tested, heating starts after the system is safely filled and powered.
Do you remove the old burst geyser?
The failed geyser is removed as part of the replacement process. The team also checks the installation area for obvious water damage, unsafe supports, valve issues and pipework problems before completing the new installation.
What causes geysers to burst?
Common causes include age, internal corrosion, excessive pressure, failed safety valves, poor previous installation, thermal stress and long-term neglected leaks. The replacement process should identify anything that may damage the new unit.
Is burst geyser replacement different from geyser repair?
Yes. Geyser repair deals with repairable faults such as elements, thermostats, valves, gaskets and connections. Burst geyser replacement is used when the cylinder has failed or repair is no longer sensible.
Can insurance require information after a burst geyser?
Many homeowners need photos, job details, invoices or fault notes for insurance purposes. Keep clear photos of the leak, ceiling damage and failed unit, and ask the plumber what information can be supplied after the job.
What can reduce the risk of another burst geyser?
Good pressure control, correct valve installation, periodic checks, attention to early leaks, safe electrical isolation and replacing aged components before failure can all reduce the risk of another geyser burst.
Related Help When a Geyser Has Failed
These related pages are useful when the geyser problem is not a simple straight replacement. They help customers compare repair, planned installation, hidden leak tracing and urgent emergency support before deciding what to book.
Geyser Repair
Use this page when the tank has not failed and the problem may still be a repairable fault such as a thermostat, element, valve, gasket, drain cock, flange leak or pipe connection. It is the better starting point when the geyser is faulty but the cylinder itself is not clearly burst.
Read MoreGeyser Installation
This is helpful for planned geyser upgrades, capacity changes, old-unit replacement before failure, or new hot-water layouts where access, support, pressure control and safety components must be considered before the installation is done.
Read MoreLeak Detection
Choose leak detection when ceiling dampness, wall stains or roof-space moisture does not clearly line up with the geyser position. Water can travel along beams and conduits, so tracing the real source can prevent repairing the wrong area.
Read MoreEmergency Plumbers Near Me
Use emergency plumbing help when water is still running, ceilings are getting wetter, electrical areas are at risk, or the property cannot wait for normal scheduling. This is the safest route when the burst geyser is actively causing damage.
Read MoreWhat To Do Right Now If Your Geyser Has Burst
If water is actively leaking from the geyser, the first priority is reducing further damage. If it is safe to do so, switch off the electrical supply to the geyser and close the water supply feeding the unit. Move valuables away from affected areas and place containers under active drips where practical.
If water is coming through ceilings, be aware that the visible stain may not indicate the actual location of the leak. Water often travels across roof structures before appearing inside the home. Areas around light fittings, ceiling joints, cornices and electrical points should be treated with caution.
If you are unsure whether the problem is a burst tank, a valve failure, a leaking element assembly, or another geyser fault, arrange an inspection before making replacement decisions. Correct diagnosis often saves both time and money.
Emergency: 067 895 4361 | General enquiries: 067 657 6109 | WhatsApp: 072 139 8945
Work We Have Done on Burst Geyser Replacements
Every burst geyser replacement tells a different story. Some customers first notice water staining a ceiling, while others find a wet drip tray, a failed roof-space cylinder, pressure-control problems, damaged insulation or a geyser that can no longer be repaired safely. The images below show real replacement work at different stages: access, isolation, diagnosis, removal, new installation, valve protection and final clearing of the failed unit. They are included to help homeowners understand what actually happens behind the ceiling and why a proper burst geyser replacement should protect the whole hot-water system, not only replace the tank.
Emergency Isolation That Protects the House First

This image shows the first safety step in a burst geyser replacement: controlling the water around the failed installation before removal begins. Isolation protects ceilings, insulation and electrical areas while the plumber confirms what is still actively leaking and what is only residual water from the failed geyser.
Fault Source Check Before Any Replacement Decision

This close-up shows why diagnosis matters before replacing a geyser. Pipework, vacuum breakers and connections can leak in ways that look like a burst tank from inside the house. Checking the source first helps separate repairable faults from a failed cylinder that needs replacement.
Controlled Draining and Safe Removal

A failed geyser may still hold a significant volume of water. Controlled draining and planned removal reduce the risk of extra ceiling damage while the plumber works around roof trusses, insulation, pipework and access limitations inside the roof space.
Checking the Installation Area Before the New Geyser Goes In

Before the replacement geyser is fitted, the installation area must be checked for support, access, drip tray position, pipe alignment and safe overflow discharge. This step prevents the new geyser from inheriting problems from the old installation.
New Geyser Installation With Pressure and Safety in Mind

The new geyser is fitted with attention to support, pipe alignment, safety components and future access. A good replacement restores hot water, but it should also improve the reliability and safety of the full hot-water system.
Pressure and Valve Verification That Prevents Repeat Failure

Pressure control is a key part of preventing repeat geyser failure. This image shows the pressure valve assembly that helps regulate the system. Checking these components protects the new geyser from avoidable stress and premature failure.
Roof Access Geyser Replacement Through Tiles

This project required careful roof access because the failed geyser was positioned inside a tight roof space. The image shows why replacement planning matters before lifting or moving the cylinder. Roof tiles, insulation, copper pipework and ceiling structure all need to be protected while the plumber creates a safe route for the old unit and the replacement geyser.
New Geyser Connected in Roof Space

This completed roof-space installation shows a replacement geyser connected after the failed system was removed. The pipework alignment, isolation points and safety components are checked before the geyser is filled and powered. A careful handover helps the customer understand where to look for future warning signs.
Failed Geyser Ready for Removal

This older geyser had reached the point where replacement made more sense than repeated repair. The drip tray, wiring and surrounding roof space all had to be assessed before removal. Situations like this are also why early geyser repair checks can help identify problems before the cylinder fails completely.
External Geyser Replacement Completed

This external geyser replacement shows a completed installation mounted against a brick wall. Outdoor installations still require correct support, pipework, isolation and safety discharge arrangements. The work must restore hot water while keeping the system accessible for future inspection and maintenance.
Roof Space Geyser Positioned for Installation

The replacement geyser was moved into the roof space and positioned before final connection. This step is often one of the most difficult parts of the job because the plumber must work around trusses, ceiling boards, insulation and access limitations without damaging the property.
Drip Tray Showing Active Geyser Leak

Water inside the drip tray is an important warning sign. It may point to a leaking cylinder, failed valve, poor discharge route or another fault above the ceiling. When the water source is not obvious, leak detection can help confirm whether moisture is still active or only left over from the geyser failure.
Replacement Geyser Installed in Utility Area

This installation shows a replacement geyser fitted in a more accessible utility-style area. Even when access is easier than a roof-space job, the same checks still matter: safe isolation, pipe alignment, correct safety components, filling, testing and clear customer handover.
Vacuum Breaker Protection on Geyser Installation

Vacuum breakers are small components but they play an important role in protecting the geyser and pipework. During replacement, these parts are checked so the new system is not left vulnerable to avoidable faults. This is one reason professional geyser installation should look beyond the cylinder alone.
Pressure Control Valve Assembly for Geyser

The pressure control valve helps regulate incoming pressure before it reaches the geyser. If this part is incorrect, worn or blocked, a new geyser can be placed under unnecessary stress. Checking pressure control during replacement helps reduce the risk of repeat failure.
Failed Geyser Removed From Property

After the system was isolated and drained, the failed geyser was removed from the property. This final removal stage keeps the work area safe and clears the way for the new installation. For active leaks or flooding before removal, customers should use emergency plumbers near me support immediately.

